Emergencies can be confusing especially if you’re new to the region or unfamiliar with the types of events that happen here.
You don’t need a big house, a basement, or shelves of supplies to be prepared. Most planning is about small actions that help you stay safe, comfortable, and connected.
In Esquimalt, we’re more likely to experience things like power outages, strong storms, extreme heat, and small earthquakes. These events can be disruptive and in some cases, like a major earthquake, the impacts could be much more serious. This section helps you plan ahead in simple, practical ways that work for your life.
Make a household emergency plan
Think about your daily routines and the people you may rely on or who may rely on you. What would you do if:
The power went out for 72 hours or more?
You were told to evacuate within 15 minutes?
You couldn’t reach anyone by phone?
Start here:
- Write down emergency contacts (local and out-of-province)
- Choose two meeting places: one nearby, one outside your neighbourhood (for you or people you may reconnect with)
- Note any health needs, support needs, or pet care requirements
- Keep a paper copy of your plan somewhere visible and easy to grab
Even if you live alone, an emergency plan helps you stay connected, make decisions faster, and ask for the right kind of help when needed.
PreparedBC - Make your Emergency Plan
An emergency plan says how you and the people you live with will respond to a disaster. Knowing what to do, where to go and who to contact will reduce stress and help keep you focused and safe.
Build your emergency kit
Your kit helps you stay safe and independent for at least one week, longer is better. Start with the basics, then build over time.
Basic Items:
- Water (4 litres/person/day)
- Food (non-perishable, easy to open)
- Flashlight + batteries
- First aid kit + medications
- Phone charger + power bank or a car charger
- Radio (battery or crank)
- Clothes, toiletries, spare keys
- Important documents (copies)
Resource:
Build an emergency kit & grab-&-go bag
You don’t need fancy gear to be prepared. Most of what you need for an emergency kit can be found at home or picked up slowly over time. Here’s a simple, affordable list to help you get started.
Basics
- Water – Clean, refillable bottles or jugs. Aim for 4 litres per person per day (even just a few bottles is a good start).
- Food – Non-perishable items that don’t need cooking:
- Crackers, granola bars, canned fruit or beans
- Peanut butter or shelf-stable spreads
- Instant noodles (if you have a kettle or stove)
- Store what you already eat
- Manual can opener – Dollar store or thrift shop
- Flashlight – Any battery-powered flashlight or headlamp
- Tip: Try to find one that uses the same batteries as your remote or smoke alarm
- Batteries – For flashlight or radio
- Tip: Store batteries out of the devices until needed to make them last longer
- Phone charger – Keep your regular charger with your kit
- Low-cost backup options:
- USB car charger (often $5–$10)
- Solar chargers or power banks if you can access a program or donation
- Radio (optional) – Dollar store, second-hand, or shared with a neighbours.
- Look for a basic battery-operated or crank radio
Health & hygiene
- Toilet paper or tissues
- Sanitary products (pads, liners, etc.)
- Toothbrush and toothpaste
- Unscented wipes or cloths
- Hand sanitizer or soap
- Face masks (cloth or disposable)
Important documents
- Photocopies of ID, health cards, and key contact numbers
- Keep in a plastic zip bag or envelope
- Write down important phone numbers in case your phone dies
Comfort & warmth
- Extra clothing (socks, warm top, underwear)
- Blanket or large towel
- Gloves and hat (for winter months)
- Sturdy shoes and flashlight near your bed
If you have pets
- Small container of food
- Leash or carrier
- Water bowl
- Copy of vet info or pet photo (in case you’re separated)
Bonus: free or shared Resources
- Neighbour Check-ins: You don’t need to prepare alone. Talk to neighbours about sharing supplies, radios, or phones.
- Local Support: During an emergency, the Emergency Program may open a Reception Centre for help with food, shelter, or supplies.
- Ask Your Community: Some schools, churches, or food banks may have programs for basic emergency items—just ask.
Preparedness for everyone
Preparedness is personal but no one plans alone.
We’ve created these short guides to help different members of our community take simple steps to feel more ready.
They’re easy to follow, quick to use, and designed with real-world needs in mind.
Emergency preparedness doesn’t have to be overwhelming or scary for kids.
This 6-week series helps families build confidence, safety, and resilience together, one week at a time. Each post introduces a small, age-appropriate action that gets your child more involved in planning and preparedness, with helpful tools and links along the way.
Week One: Start the Conversation
Emergencies are easier to understand when they’re talked about calmly and with care. This week, begin by asking simple, open-ended questions like:
“What do you think we’d do if the power went out?”
“Have you ever wondered why the fire alarm goes off?”
Look for natural opportunities, bedtime, mealtimes, or while playing. Keep your tone light and focused on helping, not fear. Kids take their emotional cues from adults, so a calm approach makes all the difference.
Resource:
Canadian Red Cross - Facing the Unexpected Activity Booklet
Week two: build a kid-friendly emergency kit
Image

Get your child involved in building their own mini “go bag.” It doesn’t have to be fancy just a few comforting, useful things they can keep ready at home, in the car, or at a relative’s place.
Some great items to include:
- Flashlight (with extra batteries)
- A snack or juice box
- A small toy or stuffed animal
- A family photo
- A card with emergency contact numbers
Let them decorate the bag or label it with their name. This gives them a sense of control and comfort.
Week three: practice together
Kids learn best through repetition and action so make preparedness part of play.
- Do a mini “grab-and-go” drill: Can they find their kit in under 2 minutes?
- Walk through your exit routes from the house or building.
- Talk about what would happen if they were at school or daycare.
Keep it short and positive, and follow it with something fun like a snack or Storytime. The more familiar it is, the less scary it feels.
Sign up for the next ShakeOutBC Earthquake Drill and practice “Drop, Cover, and Hold On” together.
Week four: create a comfort card
Emergencies can be confusing especially for kids. A comfort card helps emergency responders (and your child) know who they are, how to reach you, and what they need.
Include:
- Full name and age
- Emergency contacts
- Allergies or health needs
- A calm, loving message like: “We’ll find you. You are safe.”
- A small photo of family, pets, or a special place
Download this template. Print extras for backpacks or your own wallet.
Week five: map out your family plan
Image

Help your child understand the bigger picture of your emergency plan. Where would you meet if you were separated? Who would pick them up? Where are the safe places nearby?
Make this a creative activity:
Draw your home and neighbourhood together
Add symbols for meeting spots and helpers
Use markers, stickers, or photos to personalize it
Stick the map somewhere visible like the fridge, front hall, or their room.
Create your plan using this Family Emergency Plan Template. A copy can be picked up at Municipal Hall.
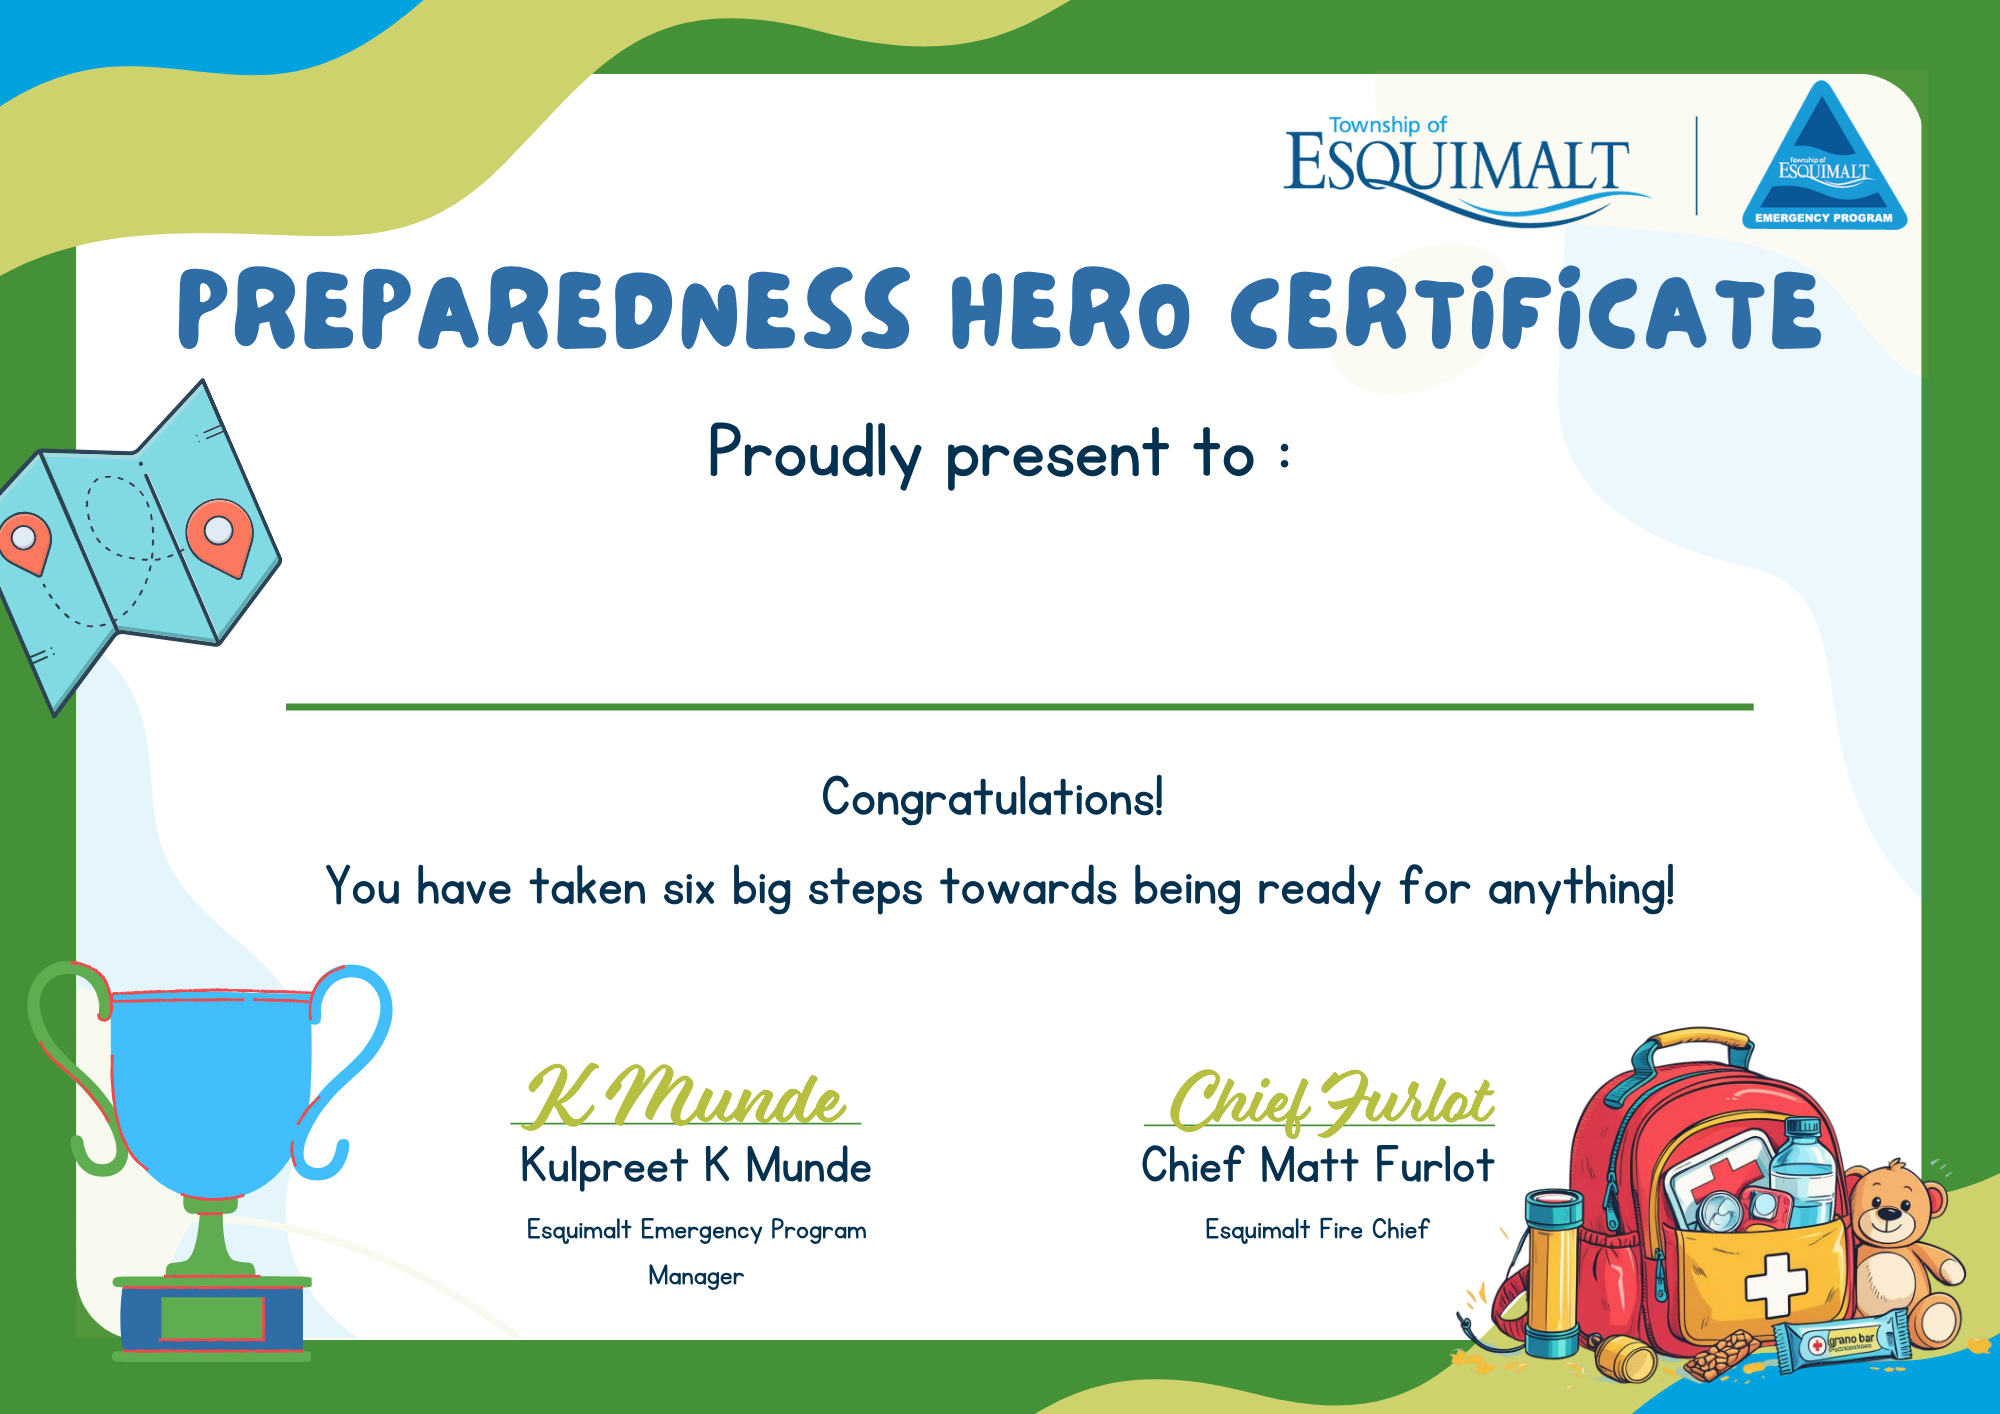
Week six: celebrate their superpower
Congratulations you and your child have taken six big steps toward being ready for anything! Now it’s time to celebrate their role in keeping the family safe.
- Download the “Preparedness Hero” certificate
- Have a treat night or movie reward
- Talk about what they’ve learned and what comes next
Building confidence is part of building resilience. Let them know they’ve done something important and empowering.
Pets are family and they need to be part of your emergency plan.
This 6-week series helps you prepare for emergencies with your furry, feathered, or scaled companions in mind. Each week focuses on a small, manageable action that can make a big difference in keeping your animals safe, healthy, and cared for when the unexpected happens.
Week one: include pets in your emergency plan
Emergencies can unfold quickly, and planning ahead is the best way to keep your pet safe.
Start by asking:
- If we had to evacuate, where would my pet go?
- Who could care for them if I wasn’t home?
- Does my pet rely on any medical care or routine that might be disrupted?
Add your pet’s name and needs to your household emergency plan. Make sure everyone in the family knows what to do, and keep a copy of your plan somewhere easy to find.
Use this guide to get started: Pet Emergency Plan
Week two: build a pet go-bag
In an evacuation or power outage, your pet will need their own go-bag, just like you.
Here’s what to pack:
- 7+ days of food and water
- A leash, collar or harness
- Waste bags or litter
- Medications and a copy of prescriptions
- A recent photo of your pet in case you’re separated
- A blanket or toy to reduce anxiety
Label the bag with your contact info and keep it near your family’s emergency supplies.
Check out this BC SPCA Pet Preparedness Guide for more detailed checklists.
Week three: know where you can shelter with pets
Not all emergency shelters accept animals. Plan ahead by identifying:
- Local pet-friendly hotels and motels
- Boarding options or nearby kennels
- Friends or family members who could help temporarily
Knowing your options means one less decision to make under stress.
Learn more from the Emergency Management & Climate Readiness Blog
Week four: practice with your pet
Emergencies can be stressful and disorienting—even for animals. Practicing now can help reduce panic later.
Try these simple steps:
- Load your pet into a carrier or car calmly, and reward them
- Walk them near your meeting place
- Do a “grab your bag” drill with your family (pets included!)
If your pet isn’t used to crates or leashes, slowly get them comfortable with these tools over time.
A few minutes of practice now could save time and stress during an emergency.
Week five: prepare pet ID & medical records
Make sure your pet has visible ID and that microchip information is up to date.
Create a waterproof folder with:
- Vaccination records
- Medications and dosage info
- A copy of their license or registration
- Emergency contacts (your vet, boarding, etc.)
Keep this folder in their go-bag or attached to their carrier.
Learn more about pet ID and microchipping from the BC SPCA.
Week six: include comfort and calming items
Even pets with calm temperaments can become anxious during storms, evacuations, or long shelter stays.
Include familiar items in your emergency plan to help them feel safe:
- Their favourite blanket or toy
- A used T-shirt that smells like you
- Treats or a long-chew item
- Calming sprays or vet-approved aids (if needed)
These items help keep their stress down and yours too.
Need more support? The BC SPCA Preparedness Page has tips for cats, dogs, and small animals.
Emergencies affect everyone but not in the same way.
This 6-week series focuses on small steps that older adults and people with disabilities (or those who support them) can take to stay safe and ready. Whether you live independently, use mobility aids, or support someone with health or access needs, this guide offers practical ways to make preparedness more inclusive and empowering.
Week one: make a plan that reflects your needs
Not all emergency plans work the same for everyone. If you live with mobility, hearing, vision, mental health, or cognitive challenges, it’s important to build a plan tailored to your unique situation.
Start by considering:
- How would I evacuate quickly?
- Who can I contact for help if needed?
- Do I have medications or assistive technology that need power?
Talk it through with your care provider, family, or neighbours. Write it down, and revisit it as your needs change.
Use this PreparedBC Guide for People with Disabilities to help structure your plan.
Week two: build a customized emergency kit
A standard kit is a good start, but you may need extra items to meet your health or accessibility needs.
Think about including:
- Extra medication and a current list of dosages
- Hearing aid batteries, glasses, mobility aids
- Assistive devices or chargers (with backup batteries)
- Copies of prescriptions and medical documents
- Comfort items like a favourite pillow or photos
Store your kit in a clearly marked, easy-to-reach location. If you live in a multi-level home, consider having a mini version on each floor.
Check out PreparedBC’s Guide for a full kit checklist.
Week three: build your support network
No one prepares alone—and in an emergency, your connections matter.
Reach out to:
- A neighbour who can check on you
- A family member or friend who lives nearby
- Care aides or support staff
- Anyone who can help with evacuation or communication if needed
Make sure they have a copy of your emergency plan and understand what support you may need.
Practice what you'd say or write in an emergency to help others assist you quickly.
For more on support, visit Stay safe and healthy in an emergency - Province of British Columbia
Week four: plan for power-dependent needs
If you rely on electricity for mobility devices, medical equipment, or communication tools, a power outage can become a serious emergency. Tips:
- Talk to your doctor or specialist about backup options
- Ask about manual alternatives (e.g., for feeding tubes, lifts, etc.)
- Get backup battery packs and test them regularly
- Register with your power provider’s medical needs registry (e.g., FortisBC)
Store instructions for your equipment in your kit and highlight anything emergency responders should know.
Week five: practice your plan
Even a quick walk-through of your emergency plan can reveal gaps or things to change.
Try:
- Practicing your evacuation route
- Timing how long it takes to get to your kit
- Testing how you'd communicate without a phone
- Identifying challenges and adjusting your plan
Doing this with someone you trust makes it easier and more effective.
Preparedness is a process keep it flexible and revisit it as things change.
Visit Older Adults | Ready.gov for more information.
Week six: keep it visible & accessible
An emergency plan is only useful if you can get to it when you need it.
Tips for staying ready:
- Keep your go-bag and medical info by the door or mobility device
- Use large labels or colour coding to help with visibility
- If you use a wheelchair or walker, attach ID or support needs visibly
- Consider a second kit for caregivers or transportation provider
If you live with others, make sure everyone knows where your plan and kit are stored.
Learn more about accessible preparedness from PreparedBC.
Bonus week: preparedness for guide dogs & service animals
Service animals are trained to stay calm in emergencies, but they still need support and supplies—especially during evacuations or disruptions. Planning ahead helps keep both of you safe.
Tips for this week:
- Pack a go-bag for your animal, including food, medications, leash/harness, collapsible water bowl, comfort item, and waste bags.
- Include your animal’s documentation (ID card, vaccination records, access letter, etc.) in your emergency documents folder.
- Use ID tags and microchips in case you're separated. Make sure your emergency contact info is current.
- Let others know you have a service animal. Add a short line in your personal plan: “I evacuate with a guide dog.”
- Do not separate unless absolutely necessary. Emergency responders and support teams should accommodate service animals at Reception Centres or temporary housing.
Practice with your animal: try a short mock evacuation with their gear, or explore alternate routes with distractions or barriers.
Check out Emergency Preparedness Tips for Guide Dog… | Guide Dogs for the Blind for more information.
When emergencies happen, your first line of support is often just down the street or across the hall.
This 6-week series is designed to help you build stronger, more connected neighbourhoods where people look out for one another. Whether you live in a high-rise, duplex, or single-family home, small actions can make a big difference in how we prepare, respond, and recover together.
Week one: know your neighbours
Preparedness starts with a simple hello. When people know and trust each other, they’re more likely to check in, share resources, or offer support in an emergency.
This week, make a point to:
- Introduce yourself to at least one neighbour
- Share basic contact info (e.g., phone number or suite #)
- Ask who might need help during an emergency and who has first aid or other useful skills
You don’t need to be best friends just having that initial connection can save lives.
Tip: Start small! Leave a friendly note or wave from your yard. Learn more at PreparedBC.ca
Week two: create a simple neighbourhood map
A neighbourhood map helps you identify who lives where, what skills or tools they have, and who may need help. It’s especially helpful for apartment buildings or cul-de-sacs.
Your map could include:
- Each home or unit and who lives there
- Contact info (with permission)
- Flags for medical needs, pets, tools (e.g. chainsaws, generators)
- A central meeting point
Keep it simple. Even a hand-drawn version on your fridge is a good start!
Check out the PreparedBC Neighbourhood Guide for more tools like this.
Week three: buddy up for emergencies
Creating a buddy system is one of the easiest and most impactful preparedness strategies.
How it works:
- You and your neighbour agree to check in on each other during heatwaves, storms, or evacuations
- You exchange emergency info (e.g., contacts, health needs)
- You agree on when and how to connect in an emergency (call, knock, text)
This is especially helpful for seniors, people living alone, and anyone with mobility challenges.
Week four: host a micro meet-up
No need for a big event just a chance for neighbours to connect.
Ideas:
- Organize a coffee drop-in or sidewalk chalk day
- Set up a table in the building lobby with maps, kits, and snacks
- Coordinate a group conversation during your block’s trash/recycling pickup
Talking about preparedness in a casual setting helps normalize it and encourages more people to take action.
Want support hosting something? Reach out to the Township’s emergency program for ideas or materials.
Week five: share & swap supplies
Most people aren’t fully stocked for every emergency—but together, your block might be.
Start a conversation about:
- Sharing tools like shovels, snow melt, or generators
- Building a shared first aid or cleanup kit
- Coordinating group buys for items like water containers, radios, or privacy screens
Some neighbourhoods even set up communal emergency bins. Esquimalt staff can help you explore this.
Learn more about neighbourhood-level kits at PreparedBC.ca
Week six: celebrate community resilience
Look for ways to recognize neighbourly kindness and build a sense of belonging.
Try:
- Highlighting a local helper (someone who brought soup, checked on a senior, etc.)
- Creating a shared message board or window sign
- Hosting a small “We’re Ready!” celebration after a drill or activity